Thursday 29 May 2008

Bonnet Scoop - 1

So..... after the fluid hose bracket I was sitting here thinking what to do next.....? So I plucked up some courage and decided to have a go at attacking the bodywork with the Dremel!!!


I decided to start with something easy..... cutting out the bonnet scoop. To start I cut out the bulk of the opening with a slitting disc, ground back the edge to remove the radius with with a sanding wheel then tidied up with a 80 then a 240 flap wheel.

Only took half an hour and I managed not to cock it up.... fairly chuffed.

So.... that just leaves a big hole to carve into the bonnet.... hmmmm... something for next week!

Engine Bay - 3

Another day another bracket...... this time for the fluid reservoir hoses:

Made from some bent up aluminium plate, two modified Harley Davidson triple hose clamps and bolted the steering column bracket. I haven't come up with a neat way of fixing the three pressure hoses yet.

There is a bit of a delay on the next batch of parts as there have been some supplier problems with the windscreens....... maybe I should use the time constructively and cut out the bonnet hole for the scoop and the scoop opening!!

Wednesday 28 May 2008

Engine Bay - 2

Today I plugged the engine bay harness into the body harness (3 plugs). I decided it was untidy and must be dealt with. So I fashioned a cover out of some aluminium plate:

Seems tidy enough to me.
Apart from that I haven't done a great deal.... except wait for the next batch of parts to be ready.

Tuesday 20 May 2008

Engine Bay - 1

Time to start sorting out bits and pieces in the engine bay. First off was to fit the heater hoses through the inner wing to the heater. I decided that just bending the silicone hose into the correct position wasn't going to look neat enough. So time for some more Aeroquip fittings (I think have developed a fetish for these!). Here's the finished article, nice and neat. I'm going to need a bracket I think under the middle hose separator clamp to stop them sagging when full of water:

The next task was to move the washer bottle as it was going to foul the hard fuel line where it entered the engine bay. The solution was to simply swap the normal positions of the washer bottle and the coil:
Next jobs will be to sort out the brake and clutch hoses and to find a way of tidying up the engine bay harness connectors.

Saturday 17 May 2008

Fitting the Body - Day 6 - 12 out of 12 Done!

Fitted the last two fixings in the boot. No pre-drilled holes so I was wondering how to mark them out? In the end I decided to drill a 0.5mm pilot ( with the dremel) from the chassis side next to the mount. From the mark inside the boot measure back to the centre of the mount - 2mm pilot hole then open out. Worked a treat!. The 0.5mm holes have been sealed with silicone. In the first photo you can just make out the 0.5mm hole to the right of the fixing:

You'll remember that I re-located the pressure gauge on the Accusump as I reckoned it would foul the bonnet. This was a smart move..... however one of the bolts on the bonnet hinge fouled the top of the Accusump body!! I spent three hours removing / modifying / refitting the Accusump bracket and now it fits OK Still can't shut the bonnet properly because it fouls on the air cleaner.... need to cut the bonnet scoop hole out!

Thursday 15 May 2008

Fitting the Body - Day 5 - 10 out of 12

Time for the 4 front inner wing fixings. So up on axles stands and wheels off. A slight tweak to ensure the body was level across the chassis and the offside front hole lined up OK. The nearside front needed opening out 1mm and the two rear holes were 2mm out laterally and 1mm vertically. Job done:So that just leaves the two boot fixings...... these will be interesting as there are no holes in the body..... going to need some clever marking out!

Tuesday 13 May 2008

Fitting the Body - Day 4 - 6 out of 12

After a four hour session of tweaking and jacking I managed to get the four transmission tunnel bolts in:
All four holes needed "adjusting" 1-2mm - easy enough with the trusty dremel. What took the time was ensuring that the body was level transversely with respect to the chassis. Not easy when my garage floor slopes all over and the jag tyres are different sizes as they are so badly worn!

Looks good outside in daylight!
In the next two pictures notice how the matt black painted lower sills are invisible!!

Next session will be the four engine bay inner wing mountings.

Monday 12 May 2008

Fitting the Body - Day 3 - Let Battle Commence!

First off I fitted the replacement body mount - this was easier said than done in the limited space available - but eventually it was done.


After plenty of mucking about I found I couldn't get the engine bay mounts to butt up against the body - being about 2mm off. Jacking the body up - moving it forward - mounts up tight. Lower the body - 2mm gap??

After a quick call to Craig at GD we tracked this down to the boot having sagged slightly. Due to the slope of the back of the boot, as the body was lowered the boot back hits the body mounts and pulls the whole lot back!

So, after a bit of trial and error I found that jacking up under the boot floor by 2 inches gave enough leeway to get the mounts up tight. Jacking and packing under the front of the main floor enabled me to get the engine bay mounts lined up.

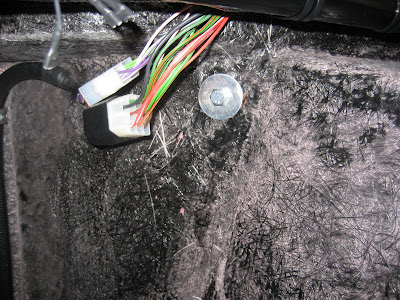
First the offside one went in (remember to check the length of the bolts so they don't foul the chassis):
Then the nearside one - I needed to open the whole out laterally by 1mm:

2 down..... 10 to go!!

I then let the boot down but the holes in the transmission tunnel were about 5mm out vertically. With a bit of levering of the boot back against the chassis and a neighbour sitting in the boot it came down to about 2-3mm.

I think the rest will come out so I have left it for tonight with about 150kg of ballast at the back of the passenger compartment - we'll see how far this gets me tomorrow.

It is starting to look like a car now:

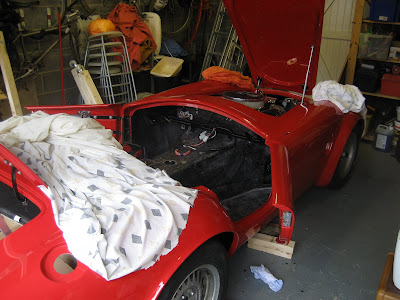
Not much room left in the engine bay!I was thinking the other day that the holes were going to be a long way out and would need elongating a fair bit...... but with a bit of persistance you can get them pretty close. Definitely one job not to rush into!

Thursday 8 May 2008

Fitting the Body - Day 2 - Not Quite!

Having thought overnight about things I set about with a new plan. I found that by jacking and inserting packing under the body the holes could be lined up pretty accurately. Applying Vaseline between the top two packs allowed the body to be moved around a bit:I started with the critical front bulkhead mounts, The nearside one went in very easily but there was small gap between the body and the mount on the offside. This was remedied by levering between the tyre and the wheelarch base (note the ratchet strap as I was doing this single handedly):The offisde was lined up and the bolt inserted. The bolt went in about half the depth reasonably easily and then just turned and turned with little resistance! For some reason it seemed that the threaded insert in the mount had become detached!

DISASTER!!

It looked like I was going to have to take the body off. After throwing some tools round the garage I sat down and had a think. I jacked and packed the body up about 9 inches at the front and 12 inches at the back:

This gave enough clearance to roll the body forwards a inch or so which was a enough room to undo the body mount fixing bolt with a spanner and withdraw the mount:I had a look at the insert (a rivnut type affair) and it could be seen that it was slightly distorted and therefore not gripping the body of the mount properly. A phone call to Andy at GD and I've asked him to send me another one.

Bugger!

So having taken the day off to get the body fixed into position it looks like I'll be tidying the garage for the rest of the day!

Wednesday 7 May 2008

Fitting the Body - Day 1

As the radiator could not be moved any further back I decided to take the radiator support frame off and strap the radiator directly - this gives another 1.5 inches clearance. I also dropped the oil cooler down out of the way:

Next the whole lot was moved outside ready for the arrival of the troops:
Placing the body over the chassis went fairly easilly - apart from the radiator frame that I had laid loose on top of the chassis getting in the way. Here's a short video to show how it's done:


Once in place and after a bit of jiggling around it was clear that the mounting holes in the body did not quite line up with the chassis mounts (only a few mm)?? One problem was that if you moved the body to line up one hole... some of the others would move out of alignment.

After re-fitting the radiator and frame I decided that was enough for one evening and I needed to think how best to move the body around with a bit more control.

Monday 5 May 2008

Preparing for Body Fitting - 4... and Final!

Last few jobs completed today. Had a bit of a problem with the radiator though. I undid the top frame bolts, loosened the lower fixings but found I could only pull it forward about 1.5 inches as the radiator is a couple of mm wider than the gap between the front chassis rails!

I know you can remove and refit the rad from below (if you can jack the car up high enough!) but that seems like an awful lot of hassle. This will mean that my "helpers" will have to lift the back of the body a bit higher.
I also fitted the battery tray as this is much easier to do with the body off.
So all that remains is to round up some volunteers...... body should be on within the next couple of days!

Sunday 4 May 2008

Stoneleigh 2008

No work on the car this weekend so far as I've spent the day at the National Kit Car Show at Stoneleigh. Fist time I've been and I was pretty impressed.

Lee Topham's superb car was on the GD stand and it really is a credit to all the hard work he has put into it over the last seven years:
Also there was the Peter Booker GD Euro - A much more modern interpretation:
There was also a factory built customer car just through SVA:
The interesting thing about this car is that it is red and has the lower sills painted black.... and it looks just fine!... So I'm happy with the way I've painted my sills:
There were plenty of Cobra's on the Cobra Club stand and I've come away with plenty of inspiration but also knowing that I've still got a lot to do!
And finally here's a short video of some Cobra's, GT40's and Ultima's leaving the show:


Now then.... must get back in the garage!